Review: Shop and Box (Shipping From United States to Singapore)
Tuesday, 26 July 2016 at July 26, 2016
Singapore is a place where you can find tons and tons of foreign products. However, there are still products that we want that are unavailable here. For beauty junkies like me, I feel you. Barry M, Anastasia Beverly Hills, Lorac, Colourpop, Charlotte Tilbury, Zoella Beauty... And even if we have the brands here, sometimes, we still don't get the full collection or special limited edition pieces eg. Tarte's Rainforest Collection, or the full range of cosmetics from Soap & Glory.
If you don't already know by now, you don't actually have to travel to the US or the UK, or other countries to purchase these products. All you need is an agent! Now there are a lot of agents who ship from the US to Singapore, a few examples are Shop and box, Vpost, Comgateway, Ezbuy, etc. Ultimately, they all do the same thing, but they incur different charges and the procedure slightly differs too.
Last month, I shipped in a bunch of beauty products from the US, and I decided to use Shop and Box. It is probably not the cheapest (I've never used the rest before but a little search on Google told me that Ezbuy was the cheapest) however it was one that was more reliable to me. Basically, a lot of the other agents simply provides you with an US address upon registering. So when you shop on the US websites, all you have to do is ship the products to your US address. Once everything you want has arrived, you can choose the option to repack everything and ship one box of goodies to yourself.
Shop and Box works a little differently. On Shop and Box, all you have to do is add in items you wish to purchase into your wish list. It doesn't have to be available online, it can even be items bought from the actual stores in US (or other the countries they offer), so items like chips, candies, or magazines can be included too. Once you're happy with your list, you can proceed to submit your order! You can still add or delete any items off your list, but at this point, Shop and Box will assign your personal Boxer to you and that is my favourite part! You will be able to chat with your Boxer which I feel is what gives me a sense of security. My Boxer, Dan, was able to use the promo codes I provided, take pictures of the items that arrived, and inform me if any item was out of stock asap.
Even though Shop and Box charges a service fee (I believe it's a percentage of the total value of your order), it gave me a sense of security as I know that the items I bought is in safe hands. I guess that would be a major deciding factor for you - Whether you are a normal mail (cheap, but has chances of it missing in the mail or getting delayed) person, or a registered mail (more expensive, but guarantees that your items reach you safely without any hiccups) person. Well to be honest, I'm usually a normal mail person, but when I'm buying something that is over a hundred dollars, I'd like to feel assured.
Payment was split into 2 parts, Invoice 1 and Invoice 2. Invoice 1 charges the items you buy while Invoice 2 charges the shipping and service charges incurred. Dan was really efficient in ordering, packing and sending out the items for me, I submitted my order on the 13th July 2016 and I made a few changes over the next 2 days (adding in items, deleting items, etc). I paid invoice 1 on the 15th July 2016 and after 10 days of paying, I received my box on the 25th July 2016. Once my items has arrived with my Boxer, it shipped it out the next day and I received it within 3-4 days which I thought was pretty quick!
All products arrived to me safely and in good condition. The smaller and slightly more fragile items like the lip products were bubble wrapped to prevent breakage.
In total, was it really expensive? Well, I did a little excel sheet to show you guys how much each item costs. The exchange rate wasn't the best (I used Paypal's rate for invoice 1 and my bank's rate for invoice 2) but in total, per item I think it was still reasonable. Even after all the extra charges, it still costs around the same as the make-up here in Singapore! So if you were to ask me, I think it's actually really worth it since these brands or products are unavailable here at the moment.
All in all, I will definitely use Shop and Box again if I want to purchase something that is unavailable here in Singapore.
Curious to what beauty products I got from the US? Stay tune! As I will be filming a little haul video on the items that I got! ;)
Disclaimer: This post is NOT sponsored. I know it sounds like it is but it's not! It was my first time using an agent like Shop and Box so I wanted to share my good experience with you.
Have you used an agent to ship products from another country before? Let me know your experience!
Hi! Today I am reviewing 3 products from the Korean Skincare brand, Troiareuke. I'm not sure if you remembered, but I previously did a review on 2 of their products on my Youtube channel last month. If you haven't catch that already, you can check it out here. I also did a write-up review of the Troipeel H+ Cushion here. MK Universal kindly sent me 3 of their products to try out again and no, I am not asked or paid to write this review for them. As usual, all opinions and thoughts are my own.
Initially, I already had a set of skincare routine (click here to watch my skincare routine) that I stick to everyday. However, to test if these products really suits me and does wonders to my skin, I basically scrapped my entire skincare routine and now, I am only using these 3 products (and my trusty Son & Park Beauty Water of course, because an exfoliator was not included among the 3 products).
Shall we begin with a little background story of my skin? I believe I have combination skin, but I'm mostly oily. I only get dry around the tip of my nose sometimes but in general, I'm usually an oily girl. I am definitely very prone to breakouts, especially during that time of the month. With that said, I usually breakout around my chin and jaw area as that's when "hormones are changing". I also breakout on random spots like on my forehead, around my eyes, etc. In short, I am quite acne-prone. And just like any of you out there, when the pimple is gone, sometimes it leaves a spot there which takes... I don't know, sometimes weeks, sometimes months to go away.
Before they sent me these products, I have sent them a photo of my bare face so they know what kind of skin I have and what products will suit me. So I guess these products I'm about to talk about are more suited for oily girls like me.
Alrighty! Enough with the blabbering, let's begin with the first step out of the three.
The first step after I've cleansed my face, is to apply the Troiareuke Skin Complex Formula 50ml (US$20).
This one is really interesting because it comes in a spray bottle! A couple of days before I received this, I went into Innisfree and I saw a toner or essence (can't remember honestly, it was random) which came in a spray bottle. I tried it on with my friend and I even told her how I really liked the idea of putting it in a spray bottle because you simply save the trouble of using cotton pads! Coincidentally, this came in a spray bottle.
So this is essentially a toner and its main function is to boost cell activity and provide a moisture shield for your face. It contains Pycnogenol which is an extract from a plant and is known to have many health benefits. However, since we're talking about putting this on our face, just know that it promotes cell activity, is an anti-oxidant, and it helps defence against aging. Previously, in my review for the Troipeel H+ Cushion, I also talked about the moisture shield function. The moisture shield can supposedly protect your face from external factors and also keeps your skin in a good environment for self-healing!
To use this toner, simply shake first before spritzing it all over your face (or if you prefer, you can also spritz it on a cotton pad). I usually do 2 spritz, because I don't have perfect aim, before patting it into my skin for better absorption.
Next, right after my toner, I apply the Troiareuke A.G.T Hydro Essence 50ml (US$20).
A.G.T stands for "Amino-acid Gel Technic" which is why this essence comes out of the tube in a gel-liked form. If you've been watching my videos, you'll know that I love gel moisturisers instead of those creamy ones because I'm oily and gel ones tend to be less oily and they get absorb in super quickly. This essence supposedly provides a good amount of moisture and hydration to your skin, whilst still gets absorb quickly, leaving your skin non-sticky and fresh. Thought I'd add in that A.G.T also has an adorable nickname which is "AnGel's Tears"!
Personally, I love how this feels on my skin. Once I rubbed it into my skin, it just melts into a watery and smooth texture. A little goes a long way too! I only use about a pea-size amount for my entire face. It actually feels like a little water balloon, once you work it into your face, it just bursts with watery goodness! If you're particular about the scent of your skincare products, this one doesn't have any strong scent to it.
Apart from using it daily in your skincare routine, you can also use it as a sleeping pack for your face and body! Just pop it in the refrigerator to solidify it a little bit, then apply a thick (0.5cm) layer of essence on your face and leave it on while you sleep. Next day, you'll wake up with extra moisturised baby soft skin!
Last of all, I will apply the Troiareuke AKNE-C Formulated Ampoule 20ml (US$60).
This ampoule is suitable for people with acne like me so I was really excited to use this because I can't even remember the day when I have zero-acne. They offer other ampoules to suit your personal skin needs. This ampoule smells really potent, which convinced me that I'll only need a teeny tiny little drop for it to make wonders to my skin. It contains phytochemical which is a natural chemical, formed naturally by plants to protect themselves. Thus, this ampoule also helps to protect our skin effectively.
There are 2 ways to use this ampoule. Personally, I simply drip a little drop directly onto my trouble areas like my forehead and chin area, and then using my hands to pat it into my entire face (but concentrating more on the troubled spots). Another way, you can actually pour either half, or the full bottle into theTroiareuke Skin Complex Formula spray bottle, mix it up and spray it onto your face directly! Sounds really fun to be honest, like a little cocktail mix for your face! After I'm done spot-treating my face, I'm definitely gonna start mixing them up. That would be so convenient!
Overall, after using these products for only about 2 weeks, I have already seen a difference in my skin. I have significantly stopped breaking out and all the pimples on my face were starting to heal pretty quickly! Before I started this routine, I had a few pimples on my forehead, around my eyes and on my chin and jaw area. But now they are mostly (I'd say 95%) cleared! I'm extremely happy with the results and hope that it will maintain it that way. As for application, I love how lightweight everything feels on my skin and doesn't make me feel greasy or oily.
If you are interested to purchase any of the products mentioned, hop on to their Facebook page here and drop them a message telling them you're interested and they will direct a link for you to purchase!
Watch my video review on the 3 products below here!
Review: Korean Ing Lashtoc's Pre-Glued False Eyelashes
Wednesday, 20 July 2016 at July 20, 2016
A couple of weeks ago, I was sent 2 sets of the Ing Lashtoc's new pre-glued false eyelashes to try out from BeautiTopping. They come in a total of 4 designs: Sexy Girl, Cute Girl, Chic Girl and Lovely Girl. I received Chic Girl and Cute Girl. Prior to receiving them, I have never heard of the brand nor the eyelashes but apparently they are new in in Korea and is a currently a new hot selling item. Once again, I am not paid or asked to write this review for them and all opinions belongs to me.
So let's begin with all you need to know about the Ing Lashtoc's new pre-glued false eyelashes.
As straight-forward as the name is, they are basically false eyelashes that are already adhesive, just like stickers! So instead of the "traditional" method of having to apply glue onto the falsies, all you need to do is peel the strip off and stick the adhesive side to your lash line!
Personally, I don't use a lot of false eyelashes. Don't get me wrong, I do love long fluttery lashes. I do have a set of Japanese ones which I have coincidentally used up few days before receiving these. But in general, I only use them at times for filming purposes, when I feel like the addition of fake eyelashes can really help to bring out the look better. Also, truthfully speaking, I really suck at putting them on and I guess the main reason why I don't use them regularly is because of all the troubles that comes with it.
A few of the troubles I had with fake eyelashes are:
- The glue drying up in the bottle. Leaving it to be a pasty mess and it is even more difficult trying to apply glue that is half solid and half liquid evenly onto the thin lash bone.
- Applying the glue evenly on the lash bone. When you mistakenly put on too much glue, it starts dripping off the sides, it starts wobbling around your lids. On the other hand, if you apply too little glue, it starts falling off your lids.
Do you experience these problems too? Well, the new Ing Lashtoc's pre-glued false eyelashes was made to counter all these problems! By removing all the hassle of applying glue, Ing Lashtoc claims that you'll now only need 3-5 seconds to put these lashes on.
After trying the lashes on, I must say that it was definitely faster putting them on than regular lashes because you skip the entire part of applying glue. Did I take 3-5 seconds? Unfortunately, I did not. The reason why was because the lashes were SO STICKY and the first time I totally wasn't expecting that. So being a person with lousy precision, I mistakenly stuck a part of it onto my real lashes. Ended up, I had to remove it entirely and reapply. Second application went a lot easier since now I know what I was dealing with. I still did not take 3-5 seconds, but probably about 10 seconds? (Bear in mind that I suck at putting fake eyelashes on!)
Apart from simply being a pre-glued eyelashes, the Ing Lashtoc eyelashes also has the following good points to note of:
- They are naturally coloured which prevents it from looking artificial and it also helps it to blend in with your natural eyelashes.
- The durability of these lashes are claimed to be 2-3 times stronger than other false eyelashes, hence they keep their curl better.
- They are waterproof.
- Lastly, they can last up to 15 hours on each wear. Which is good if you're planning to wear them for long hours.
For bad points, I noticed that the bone of the lashes are really thick and black. So it looks really obvious and unnatural (especially for "Cute Girl", "Chic Girl" wasn't that bad) if you are not wearing any eyeliner or eye make-up.
Overall, I think they make my life so much easier and I really like how they make my eyes more defined and alluring. I would definitely save them for more special occasions (I wore a pair to my cousin's wedding, view my vlog here!) and/or for filming purposes!
If you're interested in getting these lashes, you can purchase them from BeautiTopping's shop on Qoo10: here. They are currently going for S$11.80 for 2 pairs of lashes!
I also did a video review for these lashes where you'll get to see the lashes up close and I also did a little test to proof it's statement of being waterproof! Take a look!
Review: BECCA x Jaclyn Hill Champagne Collection Face Palette
Saturday, 16 July 2016 at July 16, 2016
The BECCA x Jaclyn Hill collection was just newly launched online in Sephora Singapore, on the 11th July 2016. By then. I have already heard tons of stuff about this awesome looking face palette in the collection. Since I have been on a hunt for a good new blusher/blush palette, I immediately placed an order for the BECCA x Jaclyn Hill Champagne Collection Face Palette the moment it was launched (watch my "unboxing" vlog for the stuff I got!).
First of all, the BECCA x Jaclyn Hill Champagne Collection Face Palette comprises of 3 blushes (1 luminous and 2 mineral blushes), and 2 highlighters. It costs S$80 with free shipping which I thought was reasonable for a higher-end brand like BECCA. The packaging is absolutely beautiful. The front cover is white with golds speckles, as if someone just popped a champagne on it. Super classy and timeless! The palette itself is not very big or bulky, hence I think it will still be a good option to take it along with you when you travel, plus there is a huge mirror in it which will be handy!
Going through all the shades in the palette, the first luminous blush shade is called Rose Spritz. Like I mentioned, I was on a hunt for a new blusher and one of the options I was considering, was the NARS Orgasm blush. The Rose Spitz turns out, surprisingly to be a good dupe for the NARS Orgasm blush! It is a coral-rosy pink with gold speckles which gives a hint of glow and flush. I think it is extremely flattering on any skin tone and can be used on countless occasions. I love myself a good glowing shade, hence this is definitely my favourite blush shade out of the 3.
The next shade is called Amaretto. This is a warm, brownish, nude, almond shade with slight orangey tones to it. I think this would be good shade to add some shading and definition to your face especially if you had a tan! I have never worn a blush that is not pink-toned hence this was very new to me and my verdict is, I love it! It is very subtle and easy to wear, especially on days when I'm already wearing brighter colors on my eyes or lips. Since it has hints of orange to it, I think it's great for summer time where I will be wearing lots of orange/coral!
The next shade is called Pamplemousse and like it's name, it is a bright pop of pink which resembles a fresh grapefruit. When used with a light brush, it looks a lot more natural and wearable, less intense and intimidating than looking at it on the pan. Since this blush is matte, I think it is a great and simple way to add some colour to your face without looking too fancy. I would personally wear this with a very simple eye make-up look while leaving the attention to my cheeks and lips. Again, I think this is an awesome shade for summertime as it's bright and fun. Also, it adds a natural flush to your face (without the glow) which makes it looks like you've just came back from the beach or a holiday!
Moving on the highlighters, the first shade we've got is the popular Champagne Pop itself. If you're looking for only a highlighter, Champagne Pop is available for sale on it's own. This is a light, peachy champagne shade with tones of shimmer. It is light, doesn't cake or crumble, and adds the perfect definition to your cheek bones.
The next highlighter we've got is called Prosecco Pop. Comparing to Champagne Pop, this one has more gold to it while Champagne Pop has more peach tones. It looks quite intense in some swatches I've seen online, however it is actually still quite subtle and very pretty if you're looking for a more beach, sun-kissed glow.
All shades are extremely pigmented, soft and smooth to touch. A little seriously goes a long way with this one. The pigmentations are so fine, you can tell that they are of good quality which makes me feel like my money was well-spent. And, since they are so fine to touch, they create the most natural glow which is one of my favourite points of this palette. I can definitely see myself reaching out for this palette often because I am loving all shades! I would definitely recommend this if you are all about that glow. It is surely not a cheap palette but it can, for sure, last a really long time.
Review: Crest 3D Advance Luxe Whitestrips & Toothpaste
Wednesday, 13 July 2016 at July 13, 2016
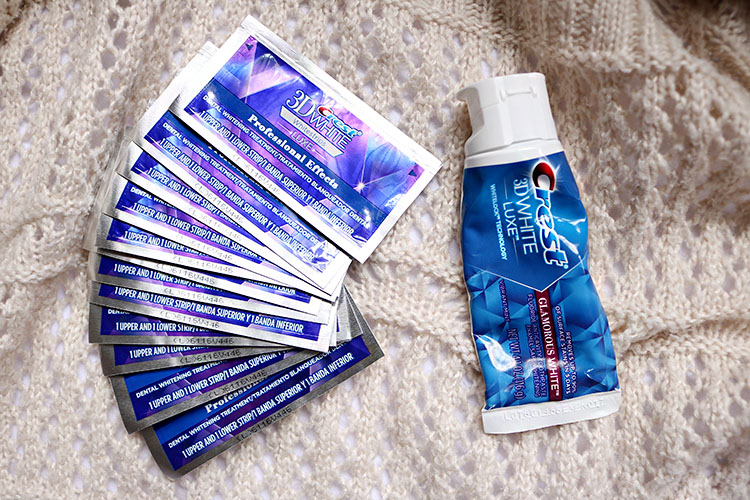
On the 18th June 2016, I finally got my braces off. I already knew that I wanted to whiten my teeth when I get them off. So a few days later I purchased the Crest 3D Advance Luxe Whitestrips and it came with a toothpaste. I got them from the shop "whitemoomoo" from Shopee SG.
Crest 3D's Whitestrips is highly raved among many many Bloggers and Youtubers, so I wanted to try them out myself. I couldn't find a detailed review about it so hopefully this review will be one.
One box comes with 20 packet of strips and it is designed to be used everyday for a 20-day treatment. Crest 3D offers a wide range of different whitestrips that are designed to be used differently, so make sure you choose the one that suits you best! For the one I'm using, I'm supposed to be able to see a difference from the 3rd or 4th treatment.
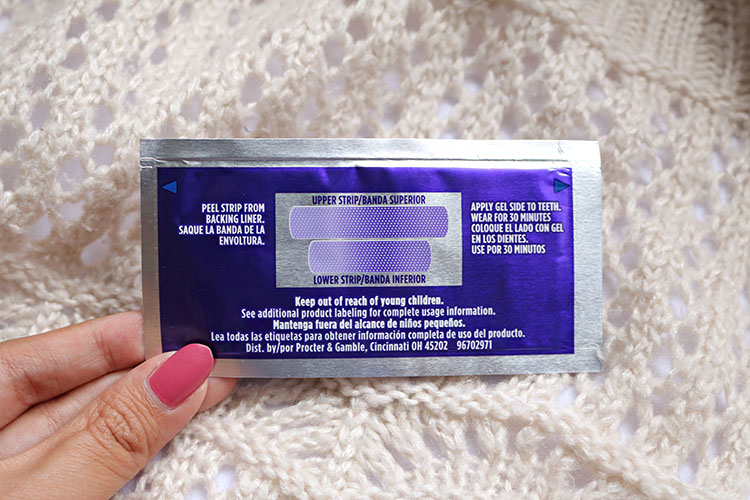
Once opened, you will see 2 strips, one for the upper teeth and one for the lower teeth. Peel them off the plastic sheet and stick the adhesive side onto your teeth. I like to carefully press them firmly onto my teeth for maximum coverage. For the Advance Luxe Whitestrips, leave them on for 30 minutes.
I have no idea why some bloggers claim that the strips are tasteless and they don't even realise it's there after awhile... Personally, the moment it was close to my teeth, I could smell it and it was gross. Apart from the strong and pungent smell and slight chemical taste, there were no other major problems such as the strips slipping out of place. I also found out that sticking it on your gum, rather than just sticking it to your teeth and then folding the excess inwards, feels a lot better!
Having it on my teeth wasn't a pleasant experience because I am honestly not a fan of the taste and feel of it inside my mouth. There is also a very slight tingling feeling on my teeth and gums, it was weird and slightly uncomfortable but it was not bearable and painful to wear. Thankfully, I only need to have it on for 30 minutes and that went by pretty fast after I have distracted myself.
After 30 minutes, you can easily peel the strips off. Then, it's time to brush! I was told that it's best to wait 30 minutes before brushing. I used the Crest 3D Toothpaste that came with the set I got.
After I was done with the 1-day treatment, I noticed that there were white spots all over my teeth and it looked really bad because it kinda accentuated the yellower parts of my teeth. But as written on Crest 3D's FAQ page, the white spots are harmless and will go away in a few hours. Since I put the strips on at night, they were gone by the time I wake up in the morning. So if it's your first time, I highly suggest you wear them at night before going to bed instead of in the morning, just in case! As the spots doesn't look nice at all.
Time for pictures of my teeth! I try to take all the shots at the same timing to minimise lighting difference.
Before any treatment:
After 1st Treatment:
I didn't see any difference in the colour of my teeth. You can also notice the white spots all over.
After 2nd Treatment:
Not much difference here... After 4th Treatment:
After the 4th day, I realised my teeth became super sensitive and my gums were so prone to bleeding when brushing. Honestly the thought of brushing my teeth scares me! The stinging feeling also became stronger whilst application so I decided to give my teeth a break at this point of time. I didn't use it for the next 4 days. Brushing became normal after 2-3 days of not using the strips and my gums stopped bleeding too. I noticed my teeth were whiter than when I first started, so I just continued with a whitening toothpaste.
After 5th Treatment:
My teeth were no longer sensitive by now, I also realised that you're not supposed to brush your teeth immediately after removing the strips. Also, applying the strips away from my gums also made it less sensitive and stinging (it was more uncomfortable as you have to tuck in the excess but I think that was actually the right way to apply it!). I also got more used to the smell and taste of it so it was not as bad as the first time.
After I was done with the 5th treatment, I was really happy with how my teeth looks like and I started receiving compliments on how white my teeth looked! I've stopped using the strips for the time being because the sensitivity and bleeding during brushing really scares me. So currently I'm just making sure not to stain my teeth with any coffee, tea, or dark coloured food or sodas. I'm also using a whitening toothpaste to maintain it's whiteness.
Overall, I am really satisfied with the results. Not to mention it was really quick as you really don't have to wait for the full 20 days to see results. You can definitely see the difference in my videos too! In this video, I just got my braces off and you can totally tell how yellow it was. While in this vlog, you can see that my teeth were not as yellow anymore! So I will definitely recommend it to anyone who is looking to whiten their teeth at an affordable price.
The day came, and I finally removed my braces! I thought that was it the end to my braces journey, but it was actually a beginning of something new.
I have never ever talked about this to anyone because it used to hurt my self-esteem and self-confidence a lot. One of my biggest insecurities was my teeth and my bite. Prior to having braces, I have an open bite, which means when I clench my teeth together, there will still be a gap in the middle of both the upper and lower row of teeth. Other than that, it made me look like I had an underbite sometimes. I was really insecure about that and really hated how my sideview looked like. I was also made fun of my bite a couple of times in secondary school. I have always wanted invisilign because when I was 16 years old, my family couldn't afford for me to go through braces. And by the time I was determined to fix my teeth, I was already 20 years old. I thought that was really old to have braces, plus I was already in University. I did not want to be laughed at or mocked at for having braces at 20 years old. Unfortunately, invisilign was way too expensive for me. But since I was so determined to fix my teeth, I decided to settle with braces.
I don't have a proper photo of my "before" teeth, but I do have a few and I uploaded all my braces pictures, progress, etc on my instagram account @maubraces. During the past 2.5 years, I've received many requests of pictures of my teeth. So here you go! Go check it out if you're interested.
So I had braces on the 16th November 2013 and I removed it on the 18th June 2016. My overall experience with braces was a pretty good one I'd say. I don't think I've hated my braces or how I looked with it. It definitely looked weird initially, but I received many compliments on how I look with braces on. The good thing about braces is that it only gets better from the day you put it on. My teeth started changing slowly, and my bite was also fixed along the way. Thus, my appearance just kept on improving as time past. In contrary, my confidence level increased when I started wearing braces and I was never mocked for having braces in University.
There were definitely discomfort throughout my braces journey, but it wasn't super bad as the discomforts usually last for at most a week. Because my teeth were so crowded, I had 4 tooth extracted and during the time of treatment, I often had springs in my mouth to make space. To fix my bite, I also wore elastics and the worst parts of braces for me was probably the elastics.
During the past 2.5 years, I've worn elastics for a total about 6 non-consecutive months. I hate it because it hurts so much to the point where I would wake up in the middle of the night because my entire mouth was so sore. It was also really troublesome as you have to constantly wear them. Plus, they break at times when I'm outside. But despite the pain of elastics, they gave me the fastest results which was why I think I had a love-hate relationship with elastics. I also wore them diligently which is really important. The pain will go away in the next 2 days if you keep on wearing them, so just persevere! During the last 2 months of wearing braces, I had to put on "triangle" elastics where you simply form a triangle shape with the elastics. It was definitely the worst as it is almost impossible to eat with it (thus, even more troublesome) and it hurt for a week, which was the longest. I was actually told to only wear them at night for the first month, but because it felt like it kept shifting back to it's original places in the morning and afternoon, I decided to wear them 24/7. Thankfully, I did not over-correct my bite. If you're thinking of wearing your elastics more than what you're told to, do check with your orthodontist! I was 90% sure it was fine which was why I wore it the entire time.
After wearing my braces and elastics diligently for the past 2.5 years, it's finally time to get them off! It just felt so surreal because I never thought that one day I'd have straight teeth with the perfect bite.
Uploading this vlog onto my Youtube channel, I have received a comment regarding my jaw being misaligned. I do have this issue and my orthodentist had told me about my jaw condition prior to putting on the braces. However, going through a jaw surgery costs a bomb, hence I decided to give it a miss. I may or may not go for a jaw surgery in future, who knows? But for now, I'm satisfied with the way my face looks like.
When I removed my braces, I had to pick between 2 different retainers. The metal one and the clear plastic one. I read many pros and cons about the two but I still could not decided which was better for me. My orthodontist ended up recommending me the clear plastic one as it was supposed to hold my teeth in place better, so I went for it!
The first time wearing it, it was weird. It felt like there were a lot in my mouth and speaking was embarrassing because you will not be able to clench your teeth together. I honestly hated my retainers because they made my mouth so uncomfortable and sore! However, being the ace patient that I am, I still wore my retainers as much as I could and things got a lot better after. I realise the reason why it was so sore the first time was because within the 2 days of not wearing any retainers, my teeth has shifted. Hence, the retainers were only moving it back to it's original places. I found out that my teeth shifted pretty quickly. If I did not wear my retainers for about 6 hours, I can already tell that they have shifted slightly. Thus, make sure your wear your retainers!
I have filmed my very last braces update video where I talked about how to care for your retainers, so check it here!
Apart from caring for your retainers, of course we still have to care for our teeth. When I removed my braces, my teeth looked so yellow it was ridiculous! It didn't look yellow when I had braces on (you can tell from the vlog when I took them off). I'm not sure why but well, it did looked yellow so I wasn't 100% pleased with how it looked after I got the braces off.
Hence, I decided to whiten my teeth using the highly raved Crest 3D whitening strips. I have done a full review (with photos!) on it right here so click to check it out!
Overall, braces honestly changed my life. I'm so happy I went through the past 2.5 years with it and I'm so ready to spend the rest of my life diligently wearing my retainers. Having straight teeth boosted my confidence so much and I am totally in love with how I look when I smile right now! Not to mention, brushing becomes so much easier with straight teeth. No more jagged areas and cramped small spaces!
 E-Mail
  Youtube