"Tea tree oil is actually good for acne."
"Tea tree oil is used to treat acne."
"Tea tree oil is safe to use with a carrier oil."
"Tea tree oil is safe to use when diluted."
I get comments like these, all the time, ever since I started eliminating essential oils in my routine. Therefore, today we're gonna set things straight, once and for all. By now, you would have, hopefully, probably, already seen or heard many people telling you to avoid essential oils in your skincare, including myself. But why? For centuries, we have been using essential oils. Essential oils are most often used in aromatherapy where they are being inhaled, they are also commonly used in medicine where they are being digest, and lastly in skincare products where they are being applied onto the skin... So what is so wrong about it? Why are some people so against about using essential oils? Isn't some essential oils like tea tree good for your skin?
Well, if you're burning with questions like this (or if you want to finally take good care of yourself and your skin), keep on reading.
Essential oils are the essence of the aromatic plant in which they are being extracted or derived from, and what they carry is the characteristic of the fragrance or scent of the plant. They can be extracted from different parts of the plant such as its bark, root, leaves, flower, and so on. Essential oils are made up of many different components. Some essential oils contains components that have the ability to kill bacteria, reduce inflammation, and etc. So yes, you're right, some essential oils do have components that are scientifically proven to provide such benefits. But needless to say one of the main component that is present in all essential oils is the one carrying the fragrance of the plant. In other words, all essential oils contains fragrance.
Side note: Essential oils are not to be confused with oils such as rose hip seed oil, hemp seed oil, castor oil, olive oil, jojoba oil, etc. Oils do not carry fragrance in them and are generally safe for the skin and body.
Let's press pause on our talk about essential oils and talk about fragrance for a minute. If someone has told you to avoid essential oils, it's most likely that they're gonna tell you to avoid fragrance too. Again, why? Because fragrance is toxic. Highly, toxic, chemicals. You're probably not gonna believe me just like that, so below are a few articles which I find very informative and I would suggest you read through them as well to get a better understanding of fragrance, especially the second and third one as it focuses on fragrance used in consumer products and in skincare.
1. The International Fragrance Association (IFRA) lists 3,059 materials that are reported as being used in fragrance compounds. Of these 3,059 ingredients, some have evidence linking them to health effects including cancer, reproductive toxicity, allergies and sensitivities. (source)
2. Fragrances are linked to a staggering number of health risks. Across multiple research studies, chemicals used to make fragrances are classified as allergens, hormone disruptors, asthma triggers, neurotoxins & carcinogens. The punchline: fragrances are highly toxic. (source)
3. Some essential oils for acne-prone skin such as rosemary, lemongrass, thyme, cinnamon, citronella, and tea tree oils do have research showing them to be helpful. But they also cause significant irritation and haven’t proven to be as effective as the gold standard active ingredient for acne, benzoyl peroxide (which research shows can even reduce redness!). (source)
Okay, so fragrance are bad, but what has this got to do with essential oils? I googled if essential oils are toxic and the top results all tells me that it's good stuff for the skin and body!!
Right. Because that's what the industry wants you to focus on, the good compounds of essential oils where studies have shown to provide skin benefiting properties. But remember what I said earlier on? One of the main component that is present in all essential oils is the one carrying the fragrance of the plant. In short, all essential oils, are essentially (no pun intended) fragrance.
Many of the natural essential oils that form the basis of fragrances have adverse or toxic effects that have only recently been recognised. The properties that make the chemicals in fragrances able to vaporise easily and stimulate our sense of smell also mean that many are highly reactive and able to stimulate immune reactions. (source)
Fragrance is basically a blend of aromatic extracts from natural and synthetic ingredients. Used in nearly 50% of beauty products, it actually has a LOT of unknown toxic chemicals that can be harmful to you. Without you knowing, fragrance can irritate skin, have toxic hormonal effects, and may even cause cancer. It may smell fabulous, but it can lead to not-so-fabulous effects on your skin and health. (source)
"Natural fragrance" is just another fancy term for essential oils to trick you into thinking that there are "good" fragrance when in reality, there is none. Marketing is manipulative!
It is noted in some studies that essential oils can be safe to use and non-irritating when it is being diluted to a maximum of 0.1% concentration (source). But as mentioned on Paula's Choice website, "lots of skincare products contain more than one essential oil, or far more than 0.1%", since essential oils are not tested for safety by the FDA before they are being sold (1 | 2 | 3). If you're an avid user of tea tree oil for spot treating acne, you might have heard of the Thursday Plantation tea tree oil which contains 100% tea tree oil. 100%! Another infamous tea tree oil product I know is the one from The Body Shop and it contains 15% of tea tree oil concentrate (source). The best part? Neither of both mentioned diluting the oil before in their directions. Even if you're kinda smart and you're aware of diluting essential oils, how would you ensure that your 100% or 15% oil is being diluted down to a 0.1% or less concentrate?
So, despite knowing that essential oils are highly toxic, let's assume you still refuse to give up on essential oils because it's been working for you. You've seen your spot become smaller the next day and there's no signs of irritations! Maybe it'll irritate sensitive skin, but you have normal skin!
Skin is very good at hiding when it’s being irritated. So, even if you don’t see a reaction, the damage is still occurring beneath skin’s surface, cumulatively leading to problems you will see later on. Irritation is pro-aging, the opposite of what most adults want from skincare. (source)
Here's the thing about sensitive skin, you can be born with it, or it can be acquired and in this case, we called it 'sensitized skin'. One perfect, living example is myself. I wasn't born with sensitive skin and I've even mentioned this fact multiple times in my videos throughout my years on Youtube. I've used countless of skincare products ever since I was a teen and none has ever given me any forms of irritations, not even redness, until I turned 26. Now, as you've guessed it, I have sensitized skin. Despite having oily skin, whenever I use a product now that contains heap loads of crap like drying alcohol, essential oils and fragrance, my skin will start to peel, feel tight and dry, and that will sometimes lead to itching due to the irritations. If you've been using skincare products containing harmful ingredients for an extended period of time and all of a sudden you're breaking out or showing other signs of irritations, and you're not sure why this product has "suddenly stopped working" for you, that should be a clear sign that your skin has finally tolerated enough of your abuse.
In conclusion, essential oils are really just fragrance with very little pros to outweigh the severity of its cons. There are simply no good reasons why you should use essential oils because you can easily find much safer ingredients in the market that provides the same benefits, without harming the health of your skin.
Review: Ossu Seiromushi 오쓰세이로무시 (BTS Jin and his brother's restaurant)!
Monday, 23 September 2019 at September 23, 2019
Ossu Seiromushi 오쓰세이로무시 is a Japanese restaurant that BTS Jin and his brother opened back in July 2018. I'm not gonna lie, I went there not knowing what to expect at all, and it turned out to be quite an experience, so I figured out, why not share my experience with my fellow ARMYs! Located a stone throw away from Lotte World, it was the perfect place to dine at after our excursion to Lotte World since it only opens during the evening. I suppose you can walk over from Lotte World, but since it was pouring, we chose to take a bus instead. Google map is your best friend here as it's not located anywhere near the main road.
The entrance was narrow and surprisingly, quite empty. It being a hot spot when it just opened, I was expecting a queue. The overall atmosphere felt rather posh with soft music playing in the background, you can immediately tell that the food ain't gonna be cheap at all. We were seated in these private cubicles which was interesting because I've never seen a restaurant like this before.
One thing I found surprising was the fact that they didn't have an English menu. After struggling with the menu for awhile, the staff came over and provided us a Chinese "menu". "Menu" because it was just a note on his phone and we still struggled with it. In the end, he recommended us to take the first set which costs 59,000won (~$70).
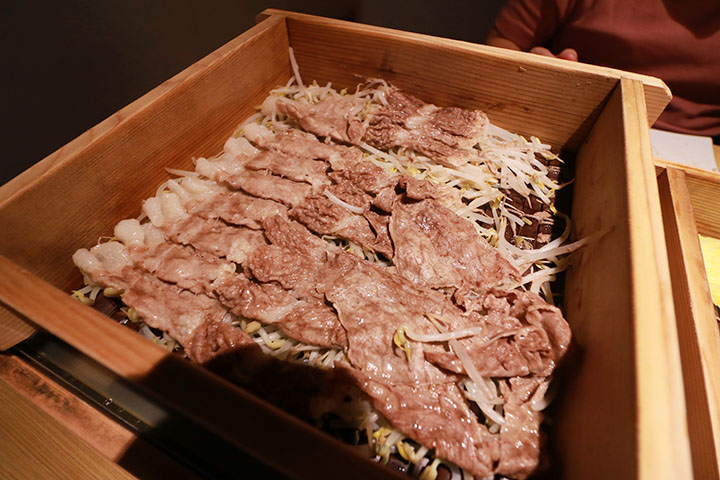
The set arrived and it came in this stacked wooden box. We were instructed to not open the lid and let it steam for ~12 minutes. After about 5 minutes, steam started emerging from the wooden box and it smelt incredible. Once 12 - 15 minutes were up, the waiter came back and it's time to dig in! The first box contained a variety of assorted vegetables, while the box on the top contained thinly sliced pork and beef.
Two types of sauces were provided, I believe one was the good ol' Japanese sesame sauce for the vegetables, and another sauce was a type of Japanese soy sauce for the meat. The meat were not too fatty which was nice and the sauce really made it much more tastier.
Even though no rice was given or included in the set, we were so full by the end of our meal! If you're not a heavy eater, I'm sure this set will be able to feed 3 pax. This was no doubt the most expensive meal we had in Korea but not exactly the most delicious meal. I'm no meat expert, but meat in Korea generally tastes a lot better than in Singapore, so honestly, I don't find the meat here extra delicious as compared to when we had meat in other, cheaper restaurants. I would however, recommend you to visit at least once if you're an ARMY just for the experience.
Address: 30 Baekjegobun-ro 45-gil, Songpa 1(il)-dong, Songpa-gu, Seoul, South Korea (google map)
Review: O'Lens x BTS Collection (DNA Destiny and IDOL Myself)
Sunday, 8 September 2019 at September 08, 2019
I am so incredibly grateful for this, I don't even know where I should begin...!! Back in April, when I was in Korea, I received an unexpected e-mail from O'lens proposing to work with me long-term, and it wasn't even like a dream come true because I've never dare dream of a chance to work with O'lens... The no.1 cosmetics contact lens brand in South Korea!!
If you haven't heard of O'lens, you must not live on Earth... Or... You don't wear contact lenses. Before I even landed in South Korea, O'lens was already on my to-buy list. Having 275 physical stores, locating one wasn't a problem at all in fact I got my first few pairs of O'lens randomly at Busan. It being a cosmetics contact lens brand, O'lens offers a massive variety of coloured contact lenses. If I have to be completely honest, being in the store made me sweat because I was overwhelmed with all the different choices!
Other than its extensive collection of coloured contact lenses and it being a trustworthy brand, O'lens is also well-known for it's affordable price tag. In addition, if you're a K-popper, you might already know that O'lens has also worked with countless of Korean idols including Blackpink, EXID, Girls' Generation, Monsta X, VIXX, AOA, Produce 48... And now... BTS!
Going back to being grateful for this opportunity, if you're new on this blog, you might not know that I'm a BTS ARMY, so just imagine how excited I was to find out that O'lens will be sending me their latest O'lens x BTS collection!!!
BTS's coloured contact lenses has always been a hot issue because... They all look so hot with (or without) them. Although these lenses from O'lens are not the actual ones worn by the members, they are inspired by the lenses that BTS are often seen wearing.
O'LENS x BTS
The collaboration, featuring 8 new monthly disposable lenses has just launched on the 7th of August 2019, and they are further classified into 2 sets, DNA Destiny and IDOL Myself. Each box will feature one member which you will not be able to choose during purchase, and there are also a total of 14 photo cards that you can collect with every purchase!
(I got the Taehyung card from the last box I opened........ Luck!!)
DNA Destiny is available in light blue, blue, brown, and pink, while IDOL Myself is available in grey, hazel, olive green, and blue. The highlight of both collection is that the colours are all pastel shades which creates a softer and brighter look. For those who prefers natural looking coloured lenses that doesn't enlarge the look of your eyes, you may be delighted to know that these lenses have a graphic diameter of 13.2mm which falls under the natural range as opposed to eye-enlarging contact lenses that can go up to 13.4mm.
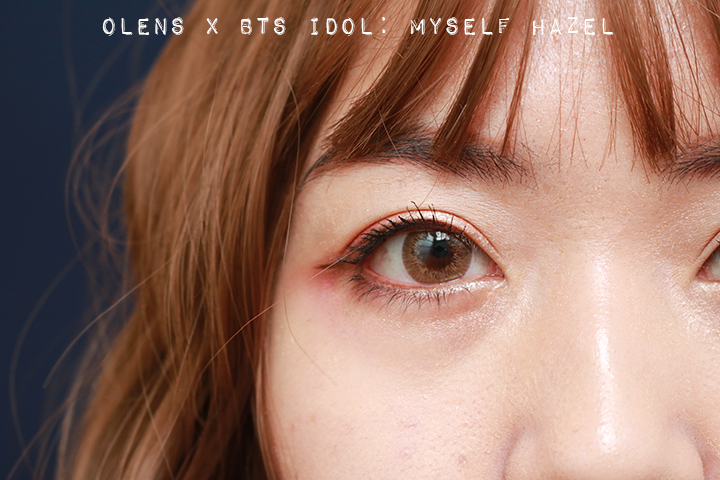
For reference and comparison, here is a photo of my natural eye without any contact lenses on.
DNA DESTINY
The DNA collection has a softer and ethereal look as the pastel shade really lightens up the colour of my eyes! I wasn't too sure about the pink, but it was surprisingly wearable as you can see from the photo below, the pink was quite subtle! Honestly, as a person who only wears brown contact lenses, I thought I'd only like the brown, but I actually can't decide which is my favourite out of the 4 shades available! I think each and every one gives off a completely different feel, without looking too unnatural.
IDOL MYSELF
The IDOL collection has slightly darker shades and it also gives off a sharper look as it has a rim on the circumference. Again... I love all the shades! The hazel is definitely my favourite since it looks the most natural for me, but I also really love the Olive Green as I think it goes really well with my skin tone. The gray has a little bit of blue in it which you'd hopefully be able to tell from the photo below.
To help compare the two collections better, I've worn the blue option on each side. On the right, I'm wearing the IDOL Myself in Blue, and on the left, I'm wearing the DNA Destiny in Blue.
If you're an ARMY, you should know that BTS is always providing us with never-ending surprises and well, reasons to spend money... And so the collection doesn't simply ends here! O'Lens has recently announced that they have launched daily lenses for DNA Destiny Brown and IDOL Myself Gray, for those of you who prefer daily lenses. In addition, they've also come up with a Bring The Soul Kits!
The Bring The Soul Kit is a limited edited, discounted set that will entitle you to receive not only those randomized photocards shown above, but also a 1 x A3 sized poster of a random member, and 7 x postcards! There are two sets available, one that contains the daily lenses, and the other that contains the monthly lenses. As mentioned, this kit is limited edition, so make sure to place your order before it's too late! Alternatively, you can also take part in the free giveaway event that O'lens is hosting to win a kit for yourself!
Overall, I would say that these lenses are a must-have or rather, must-try if you're a BTS fan as they really do look like the ones worn by the members. Other than that, they are also very wearable for those of you who are new to coloured contact lenses!
Review: Pre-Wedding Photoshoot in Korea Part 3 with Wonkyu Studio (Sixth Floor)
Thursday, 5 September 2019 at September 05, 2019
This is the third, and final part of our pre-wedding photoshoot journey where I will be talking about our experience in Korea with Wonkyu Studio! We met them for a total of 3 days in Korea, so grab a snack because this is going to be a long post. If you haven't read the first and second part where I've talked about how we booked with Wonkyu, the hiccup we encountered, and the pre-photoshoot preparations we did, here are the links to those blog posts:
A day before, I received a Whatsapp message from our translator, Ruo Lin, who confirmed the pick-up location and time with us. Since we stayed at an Airbnb, I thought it would be inconvenient for her to find the location, but it wasn't and she picked us up right below our apartment. I was expecting a private car with a private driver... But she came in a taxi and had to call another taxi to chauffeur us to Rosa Sposa. The journey took about 30 minutes from our Airbnb and in no time, we arrived at Rosa Sposa which is located at Gangnam.
Rosa Sposa has such a vintage feel to it, I love it!! We started with the groom's suit and so first, they got my boyfriend to change into the basic white button down and a black pair of pants which were included in the package. During fitting, they also provided him a pair of shoes (only for fitting!!) so you don't have to bring your leather shoes during the fitting. There are two types of white button down, one with the collar suitable for neck ties and another for bow ties. My boyfriend brought his own white shirt for his neck ties, so we had 2 options. Do note that only bow ties are provided in the package.
Waiting for the staff to get the correct size of shirt and pants out for him!
After that, it's time to pick the blazers! The lady (okay, it was an ahjumma but I'll call her 'the lady' instead because I think it sounds more polite haha) picked out a number of blazers for us according to the studio we will be shooting at, which is Sixth Floor. Only black, blue, white and grey blazers are included in the package. During the fitting, we are allowed to take photos of every blazer so we can compare and pick our favourite one at the end of the fitting session.
We decided to go with the first blazer which is a black one, as I felt that it looked the most classic and simple, a look that we had in mind already actually. After finalizing our pick, the lady also took some measurements to make some amendments and adjustments so it'll fit him better. With that, the groom's fitting session ended within about 30 minutes!
Moving on to the bride's fitting, I was allowed to try on a total of 8 dresses and only 8 dresses. By default, it is set at 3 ballgown dresses, 3 slim dresses, and 2 coloured or evening gowns. But if you want, you can make some changes like for me, I didn't want any of the coloured gowns after browsing through their collection, and so I ended up trying on 3 ballgown dresses, 3 slim dresses, and another 2 white dresses. The gowns were chosen by the designer of Rosa Sposa herself based on the images I've pinned on Pinterest and my preferences as I did tell her that I wanted some puffy sleeves and off-shoulder pieces. If you don't like any of the dresses she picked, you can choose not to try them on and she'll re-pick another one so you don't waste one chance of fitting. For every dress, they'll bring along some add-ons such as boleros for you to try on as well.
Dress fitting was exhausting going through so many looks! Since I wasn't keen on getting any coloured gowns or "evening gowns", Ruo Lin actually asked if I wanted to try out vintage wedding dresses which are apparently a trend in Korea at the moment! I didn't know what vintage gowns look like so she brought a few to me. I didn't like the look of the first dress and so I didn't try it on, but ultimately, I tried on 2 other vintage dresses to finish up all my 8 fittings.
Once we're finally done with all 8 fittings, my boyfriend and I were left alone in the room to look through the photos and decide which are the dresses I want. During this time, you must also let them know which are the add-ons you like, so they can bring it along to the studio too.
Since I have an extra mini dress included in my package, I was allowed to pick one but I wasn't allowed to try it on. I decided to go with a periwinkle and light violet coloured one to match with my boyfriend's navy suit which he brought himself, and with that, the dress fitting has successfully ended!
Day 2 (22nd April 2019): Shooting Day
We were picked up at 7:30AM and went straight to Soonsoo in a cab for our hair and makeup. For the bride, we get to put on a sheet mask first before our base makeup which was done by an assistant I suppose. My skin was horrible on the day of the photoshoot as I had a really bad break out in Korea, so it took quite awhile for her to cover up the pimples (...wanted to say imperfections but it's not an imperfection unless you see it as one!!!). Regardless, all pimples will be photoshopped away anyway, in fact, your skin will look a thousand times more flawless and poreless after they edited the photos, so don't be too stressed up about it! After base makeup, I was brought to the makeup artist for the rest of my makeup.
I did show my makeup artist a photo of what I wanted but it turned out different. It was rather disappointing since I was so excited to get my makeup done by a celebrity makeup artist but the final look turned out to be something I wouldn't attempt to recreate myself. Maybe it's because Soonsoo specializes in idol makeup so I guess I looked like I could star in a music video...? I mean, the other beauty salon, Jenny House, seems to cater more to actresses, so perhaps if I chose Jenny House, my makeup would be less heavy. Either way, I was asked a couple of times if the makeup was alright and I said it was... Because I didn't look ugly (in fact I remembered checking myself out in the toilet and telling myself 'wow I look good today' haha!)... It just wasn't a look I was used to as it was rather heavy which made my eyes look really big. Nevertheless, despite not feeling myself in the makeup, I think I actually looked great in the photos which is the most important thing isn't it?
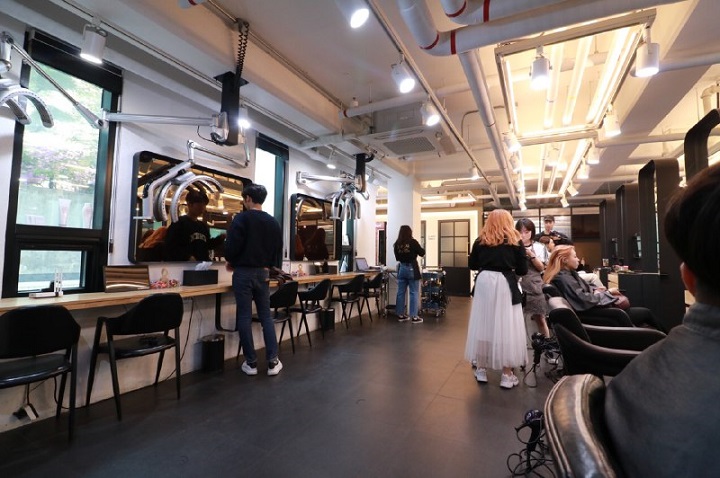
Waiting for our turn to get our hair done!
Next, we moved to the hair salon to do our hair and once again, I showed them a photo of what I wanted and it came out looking completely different... I supposed it's because I wanted an effortless, kinda messy, wavy look, but like I mentioned in my Korean Inspired Bridal Hair-styling video, Koreans seem to go for neat looks instead. Once again, I guess they know what they were doing though because in real life, my hair was super voluminous, but weirdly, it didn't really look like that in the photos.
Finally, it was time to change into my gown at Soonsoo with the help of my assistant (who was also an ahjumma). Our first shooting location was at the hanok (Korean traditional house), and so I chose to wear my vintage gown first. After I got dressed, my makeup artist and haistylist came to check on my makeup and hair again for the final time and they also applied body makeup on my neck and chest before I leave Soonsoo. This time round, we took a 7-seater cab, but the journey from Soonsoo to the Sixth Floor studio only took about 5 minutes.
Once we arrived at the Sixth Floor studio (which is literally located on the sixth floor of a building), we had to choose 30 scenes that we want from the Sixth Floor portfolio.
Discussing the shoot with our photographer!
We didn't choose 30, I think we only chose 27, and we left the rest to our photographer to decide. I highly recommend you to choose all 30 though because after the shoot, we noticed that my boyfriend didn't get any solo shots at the Sixth Floor studio. After which, it's time to head to the hanok which is... Surprisingly located inside another building which was about a 3 minutes walk away from Sixth Floor.
Sadly, I don't have much footage of the shoot because I was told that we weren't allowed to film with a camera during the shoot (mobile phones are alright), but here are some of the behind the scenes photos taken by our candid photographer!
Started with the rooftop shoot before heading down to the hanok!
Lunch break! We had Korean take-outs and it was good!
Throughout the photoshoot, we were guided on how to pose, how to look good while kissing, where to put our feet and hands, what sort of expressions we should make, and so it was overall easy with the help of everyone at the shoot. We definitely felt the professionalism of our photographer as he paid attention to every single little detail like how a pot of plant was placed so the leaves would look better in the photos! Being an introvert, I was expecting myself to be hella awkward and shy, posing in front of people I just met, but it was surprisingly fun, just... Very, exhausting.
We wrapped up the shoot at about 5PM-ish and we were so so tired, we just decided to cab back and nap before ordering Jjajangmyun delivery for dinner!
Day 3 (23rd April 2019): Collection of Photos & After
You can pick whatever day you want to view and collect the photos, but we were so eager to see them we chose the very next day! At the Wonkyu HQ located at Seongsu, we got to view all the photos taken, we made our balance payment in cash, we got got to see a sample of the physical album, the frames, and we were also given a USB that contains all our photos! Initially, I thought well since it came in a USB, we had to wait till we're back in Singapore to look at the photos again, but nope! The Wonkyu staff who contacted me right from the beginning immediately sent me a dropbox folder on Whatsapp which contained all our photos so we could easily save them in our phone!
After we came back from Korea, we had to go through all ~800 photos (~300 candid and ~500 non-candid) to decide which will be the ones that will be edited and printed out on our album. The first re-touch took a month which included retouching of the colour and tones, as well as photoshopping any imperfections. We had many rounds of retouch and honestly it was a really annoying and frustrating process. Here are some of the photos without the retouch:
Each round took at least 2 to 4 weeks, depending on the number of photos, and I guess it was annoying because you don't communicate with the editor directly, so you can only really know if they understood what you want 2 to 4 weeks later. I would say that I'm not 100% satisfied with some of the photos because some of them went through like... 5 rounds of editing, and they still couldn't get what I want. A few issues I had were the lipstick being too red... Or I looked too white... But as I'm typing this, we've finally confirmed all the photos for printing and I guess overall, I am satisfied with how most of the photos turned out. Here are just 2 of the retouched, confirmed photos as a sneak peek:
Printing of the album and frame will take about a month and a half. Once we received them and confirmed that everything is in order, we will conclude our journey with Wonkyu Studio! I'm so excited to see how the photos will look after printing and I can't wait for you guys to see it too... At our wedding... Which will not be happening anytime soon... (LOL).
 E-Mail
  Youtube